Table of Contents
1. Patient Checkout Process:
When all medical professionals in the appointment have discharged the patient, it is time for the patient to Checkout.
-
- The patient returns to the front desk.
- Go to the Checkout section and select the patient who needs to Checkout.

Front Desk/Receptionist
2. Navigating to Checkout:
-
- If the patient has outstanding invoices, the Action column will display two buttons instead of one:
- A blue-filled arrow icon (Checkout button).
- A red-filled Outstanding Invoices button.
- If the patient has outstanding invoices, the Action column will display two buttons instead of one:

3. Handling Outstanding Bills (Only if patient has outstanding bills):
-
- Select the Outstanding Invoices button to review and discuss any unpaid bills with the patient.
- If there are no outstanding bills, or once they have been resolved, proceed to the next step.

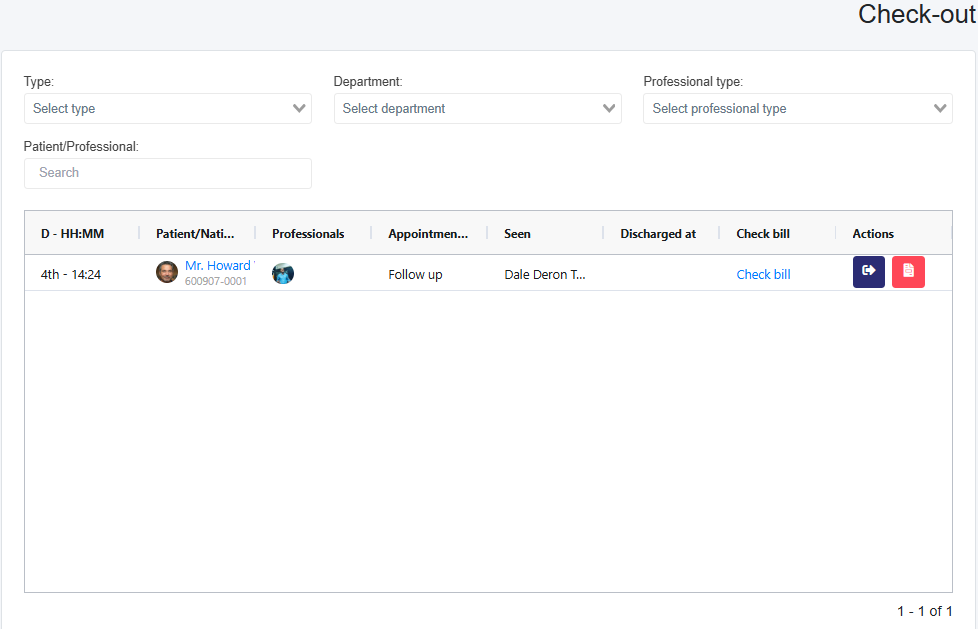
4. Reviewing, Payment, and Finalizing Bills:
- In the Check Bill column, select Check Bill to review the sales receipt or invoice.
- If the bill is in Draft status, this will be indicated in the top-right corner near the document number.
- (Optional) Click the history button to view a list of changes made to the bill.
Making a Payment on an Invoice that generates a payment receipt:
Please note: Invoices are for multiple payments over a period of time, and Sales Receipts are for a single full payment. If you create a Sales Receipt, you don't need to add a payment because sales receipts are for payments in full only.
- Above the invoice, there is a + New Payment button
- You will not see this button for a Sales Receipt
- This button opens a pop-up where you will enter the information for the payment, then save.
To finalize a draft invoice:
-
-
- Select the edit icon, review the details, and click Save or Save and Send to email the invoice to the patient using the envelope icon.
-

5. Sending Invoice/Sales Receipt Emails:
-
- If the envelope icon is:
- White with an open envelope: The bill has not been emailed.
- Blue with a closed envelope: The bill has already been sent.
- To email an unsent bill, click the envelope icon.
- There are options to Print or Download.
- If the envelope icon is:

6. Finalizing and Viewing Finished Appointments:
-
- Return to Checkout and select the blue box with a door and arrow icon in the Actions column.
- On the page that loads, select the Check Out button.
- Once the patient is checked out, the Finished page will display all completed appointments.
